How I Automated HubSpot Email Builds with n8n (No Engineering Background Required)
I used to spend 10 minutes manually copying approved copy into every HubSpot email. Here's how I built a workflow that does it in under 60 seconds.
I am skeptical. Every “AI agent” I click into is underwhelming.
And it’s not my world. My world is lifecycle marketing. I build and run email programs for B2B SaaS companies.
Will AI really replace my work? I’m sure, so I decided to figure out what it could look like in practice.
After a lot of trial and error, I landed on finding workflows that remove a small, specific piece of grunt work. And this post walks through the first one I’m genuinely proud of.
The problem: approved copy, tedious execution
I have great clients. Many of them shoot me a note when a campaign is fully written, reviewed, and approved. I have the copy for six emails in a Google Doc. All I need to do is build each one in HubSpot, which means clone the template, paste in the subject line, preview text, headline, body, CTA, and URL, check the formatting, and move on.
There’s no judgment involved. It’s not creative work. It’s copy-paste one piece after another, and it’s slow. My phone is most effective at distracting me during this part of my work.
At 10 minutes per email, a six-email campaign is a full hour of my time. So instead, could I paste the full campaign doc into something, click a button, and have all six emails sitting in HubSpot as drafts ready for QA? No cloning, no copying, no formatting checks until the end?
Surprise, the answer is yes.
Why n8n (not an AI agent)
I want to call out something important here: this is not an AI agent autonomously running email campaigns. There is one AI step in this entire workflow. The rest is structured data processing, API calls, and a loop. I just couldn’t have figured out how to build the data processing without the help of AI.
There are dozens of other ways to do this. I actually did build a version of it in Claude Code. But a workflow in n8n felt easier to maintain, easier to modify, and easier to hand off. As someone who doesn’t come from an engineering background, I’m more comfortable debugging a visual workflow than a script buried in a terminal.
Understanding who you are, and building to match that, is important.
How the workflow actually works
Here’s every step, in plain terms and with the actual code behind each one.
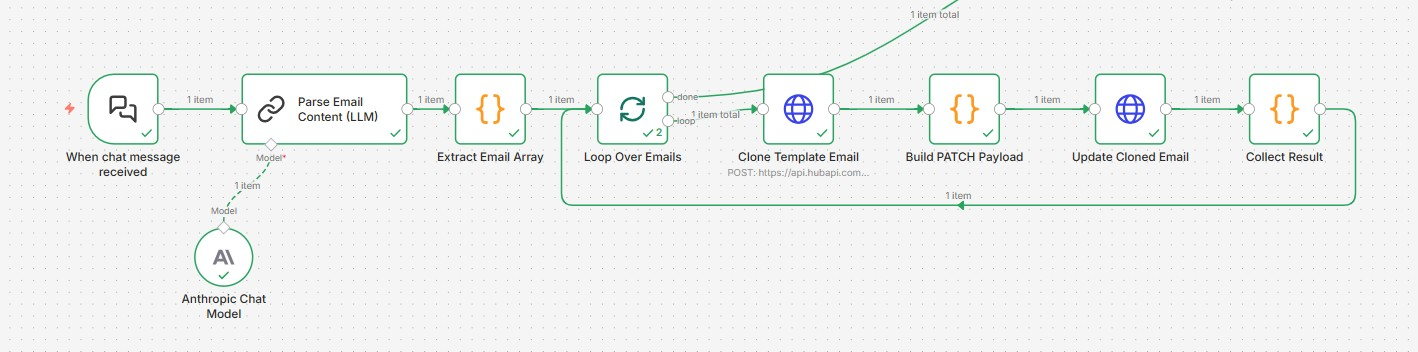
Step 1: Paste your copy into the chat
The workflow starts with an n8n chat trigger. It’s a simple chat window you open inside n8n. You paste in your approved email copy: one email or an entire campaign doc with eight emails. That’s the only thing you touch.
Step 2: Claude parses the copy into structured data
The chat input goes to Claude with a detailed system prompt that tells it exactly what to extract from the copy. The prompt covers ten fields per email, gives rules for how to format the internal email name, and specifies where body copy belongs (primary vs. secondary, based on whether it drives action or provides context).
Here’s the full prompt:
You are an email content parser for the marketing team. You receive approved email copy
and extract structured data so it can be pushed into HubSpot.

For EACH email in the input, extract exactly these fields:

- email_name: Format as Blast_MMDDYY_Newsletter_Short_Description
- subject_line: The email subject line
- preview_text: The preheader text (null if not provided)
- banner_image_url: Feature image URL (null if not provided)
- banner_link_url: Where the banner image links (falls back to cta_url)
- header_text: Main H1 headline, plain text only
- primary_body_html: Core message driving toward the CTA. Wrap paragraphs in <p> tags.
- secondary_body_html: Supporting context, tips, PS lines below the feature image
- cta_text: Button label
- cta_url: Button URL

Rules:
- Return ONLY valid JSON. No markdown, no explanation.
- Always return an array, even for a single email: [ { ... } ]
- Parse multiple emails separated by dividers as separate objects.
- Do not invent content. Only extract what's provided.
Your will look different, and will require other elements. The key constraint is that Claude must return clean JSON every time. No commentary, no formatting around it.
Step 3: A JavaScript node cleans and splits the output
Claude’s response comes back as text, so this node strips any stray markdown and parses it into an array of email objects. One per email. I’m no developer, so I used Claude to help me write the JavaScript for this node.
const raw = $input.first().json.text;

let cleaned = raw.replace(/```json\n?/g, '').replace(/```\n?/g, '').trim();

let emails;
try {
  emails = JSON.parse(cleaned);
} catch (e) {
  throw new Error('LLM did not return valid JSON. Raw output: ' + raw.substring(0, 500));
}

if (!Array.isArray(emails)) {
  emails = [emails];
}

return emails.map((email, index) => ({
  json: {
    index,
    email_name:          email.email_name          || null,
    subject_line:        email.subject_line        || null,
    preview_text:        email.preview_text        || null,
    banner_image_url:    email.banner_image_url    || null,
    banner_link_url:     email.banner_link_url     || null,
    header_text:         email.header_text         || null,
    primary_body_html:   email.primary_body_html   || null,
    secondary_body_html: email.secondary_body_html || null,
    cta_text:            email.cta_text            || null,
    cta_url:             email.cta_url             || null
  }
}));
If the input had three emails, you now have three separate items flowing through the workflow.
Step 4: Loop through each email
A SplitInBatches node takes the array and processes each email one at a time. Everything from here runs once per email before moving to the next.
Step 5: Clone the master template in HubSpot
For each email, the workflow calls the HubSpot API to clone your master template and rename the clone:
{
  "id": "208XXXXXXX",
  "cloneName": "Blast_052826_Newsletter_XXXXX"
}
This gives you a fresh copy with your layout, fonts, footer, and branding already in place.
Step 6: Build the PATCH payload
This is the most complex node, and the one that takes the most time to figure out when you’re setting it up for the first time.
Every module in a HubSpot drag-and-drop email has a unique ID. When you PATCH the email, the payload has to include all the styling and inherited properties for each module. Otherwise, HubSpot doesn’t know how to reconcile the update and the module renders blank. You’ll almost certainly hit a blank email the first time you try this. That’s normal.
The way I solved it? I cloned the email first, got the full widget map back from HubSpot’s response, and then used Claude to help me understand which module ID mapped to which content block (banner, headline, body, CTA). Once I had that map, I could build targeted updates that touched only those modules and left everything else alone.
Here’s an example of full code:
function deepClone(obj) {
return JSON.parse(JSON.stringify(obj));
}
function spaceParagraphs(html) {
if (!html) return html;
return html.replace(/<\/p>\s*<p/g, '</p><p> </p><p');
}
const clonedEmail = $input.first().json;
const clonedId = clonedEmail.id;
const widgets = clonedEmail.content?.widgets || {};
const loopNode = $('Loop Over Emails').first();
const e = {
email_name: loopNode.json.email_name,
subject_line: loopNode.json.subject_line,
preview_text: loopNode.json.preview_text,
banner_image_url: loopNode.json.banner_image_url,
banner_link_url: loopNode.json.banner_link_url,
header_text: loopNode.json.header_text,
primary_body_html: loopNode.json.primary_body_html,
secondary_body_html: loopNode.json.secondary_body_html,
cta_text: loopNode.json.cta_text,
cta_url: loopNode.json.cta_url,
};
const updatedWidgets = {};
for (const key of Object.keys(widgets)) {
updatedWidgets[key] = deepClone(widgets[key]);
}
if (e.preview_text) {
updatedWidgets['preview_text'].body.value = e.preview_text;
}
if (e.header_text) {
updatedWidgets['module_176797553XXXXX'].body.html =
`<h1 style="line-height: 1.6; color: #000000;">${e.header_text}</h1>`;
}
if (e.primary_body_html) {
updatedWidgets['module_177490359XXXXX'].body.html = spaceParagraphs(e.primary_body_html);
}
if (e.cta_text) {
updatedWidgets['module_176892644XXXXX'].body.text = e.cta_text;
}
if (e.cta_url) {
updatedWidgets['module_176892644XXXXX'].body.destination = e.cta_url;
}
if (e.banner_image_url) {
updatedWidgets['module_177084573XXXXX'].body.img.src = e.banner_image_url;
updatedWidgets['module_177084573XXXXX'].body.img.alt = e.header_text || e.email_name || 'Email image';
updatedWidgets['module_177084573XXXXX'].body.link = e.banner_link_url || e.cta_url || null;
}
if (e.secondary_body_html) {
updatedWidgets['module_177014126XXXXX'].body.html = spaceParagraphs(e.secondary_body_html);
}
const patchPayload = {
name: e.email_name || clonedEmail.name,
subject: e.subject_line || clonedEmail.subject,
sendOnPublish: false,
content: { widgets: updatedWidgets }
};
const missingFields = [];
if (!e.email_name) missingFields.push('email_name');
if (!e.subject_line) missingFields.push('subject_line');
if (!e.preview_text) missingFields.push('preview_text');
if (!e.banner_image_url) missingFields.push('banner_image_url');
if (!e.header_text) missingFields.push('header_text');
if (!e.primary_body_html) missingFields.push('primary_body_html');
if (!e.secondary_body_html) missingFields.push('secondary_body_html');
if (!e.cta_text) missingFields.push('cta_text');
if (!e.cta_url) missingFields.push('cta_url');
return [{
json: {
clonedEmailId: clonedId,
email_name: e.email_name,
patchPayload,
missingFields
}
}];Again, I don’t understand most of this. I’m learning. Claude got me there.
Step 7: PATCH the email in HubSpot
The payload gets sent as a PATCH request to:
https://api.hubapi.com/marketing/v3/emails/{clonedEmailId}HubSpot updates the draft in place. sendOnPublish is set to false, so nothing goes out accidentally.
What this actually saves
For a single email, the savings feel incremental. Maybe 10 minutes down to 5. Not life-changing on its own.
But for a six-email campaign with pre-approved copy, the math changes fast. What used to take an hour now takes about 10 minutes. And that’s trying to be conservative. The workflow itself finishes in less than 60 seconds. But I’m realistic and want to add minutes to upload images (which still happens manually) and do a final QA pass.
But still, a 60-minute task down to 10.
What I’d tell you if you tried to copy this exactly
Don’t expect it to work on the first try. Your HubSpot module IDs are different from mine. Your template structure is different. The way your copy is formatted might parse differently. You’ll hit a blank email. You’ll get a JSON parse error. Something will break.
That’s fine. And good! AI gives you a path via debugging. When something breaks, you paste the error in, ask what’s wrong, fix it, and move forward. You’re not expected to know how PATCH requests work before you start. You learn it by doing it, with AI helping you understand what went wrong at each step.
The principle here isn’t “here’s a workflow you can download and run.” It’s: you can now build specific, functional tools for the work you actually do, without an engineering background, and AI is what makes that possible.
Start small. Prove one thing out. Then expand.
Of course, if you’d like me to build this for your team, book some time.
Want to talk through whether something like this makes sense for your email program? Book a call.